Shadowsocks 内网穿透配置
服务端配置
1. 安装 Shadowsocks 服务端
# Ubuntu/Debian
apt install shadowsocks-libev

# 启动服务
systemctl start shadowsocks-libev
systemctl enable shadowsocks-libev
2. 配置服务端
编辑配置文件 /etc/shadowsocks-libev/config.json:
{
  "server": "0.0.0.0",
  "server_port": 8388,
  "password": "<密码>",
  "timeout": 300,
  "method": "aes-256-gcm"
}
3. 重启服务
systemctl restart shadowsocks-libev
systemctl status shadowsocks-libev
4. 检查服务状态
# 检查端口监听
netstat -tlnp | grep 8388

# 查看日志
journalctl -u shadowsocks-libev -n 50 --no-pager
5. 检查防火墙
# 检查 UFW 状态
ufw status

# 如果 UFW 启用,开放端口
ufw allow 8388/tcp
6. 云服务商安全组
重要! 必须在云服务商控制台开放 TCP 8388 端口。
客户端配置
方案 1:使用 npm 安装(Windows)
# 创建项目目录
mkdir shadowsocks-client
cd shadowsocks-client

# 安装 Shadowsocks 客户端
npm install shadowsocks
创建 start.js:
const { createServer } = require('shadowsocks');

const config = {
  server: '<服务器IP>',
  server_port: 8388,
  local_port: 1080,
  password: '<密码>',
  method: 'aes-256-gcm',
  timeout: 300
};

console.log('启动 Shadowsocks 客户端...');

createServer(config)
  .then(server => {
    console.log('✓ 代理运行在 127.0.0.1:1080');
    console.log('按 Ctrl+C 退出');
  })
  .catch(err => {
    console.error('错误:', err.message);
  });
启动客户端:
node start.js
方案 2:使用 Python 客户端
# 安装 Python 客户端
pip install shadowsocks

# 启动客户端
sslocal -s <服务器IP> -p 8388 -k <密码> -m aes-256-gcm -l 1080
方案 3:使用 shadowsocks-libev Node.js 绑定
npm install shadowsocks-libev
测试连接
1. 测试端口连通性
从本地设备(国内)测试:
# Windows PowerShell
Test-NetConnection -ComputerName <服务器IP> -Port 8388

# 或使用 nc(Linux/macOS)
nc -zv <服务器IP> 8388

# 或使用 telnet
telnet <服务器IP> 8388
2. 测试代理
# 测试访问 Google
curl --socks5 127.0.0.1:1080 https://www.google.com

# 测试访问 GitHub
curl --socks5 127.0.0.1:1080 https://github.com

# 测试速度
curl --socks5 127.0.0.1:1080 -o nul -w "状态码: %{http_code}\n速度: %{speed_download} bytes/s\n时间: %{time_total} 秒\n" https://www.google.com
配置 Git 使用代理
方案 1:全局配置
git config --global http.proxy socks5://127.0.0.1:1080
git config --global https.proxy socks5://127.0.0.1:1080
方案 2:只对 GitHub 使用代理
git config --global http.https://github.com.proxy socks5://127.0.0.1:1080
方案 3:临时使用(不修改配置)
git -c http.proxy=socks5://127.0.0.1:1080 clone https://github.com/xxx/xxx.git
取消代理
git config --global --unset http.proxy
git config --global --unset https.proxy
查看当前代理配置
git config --global --get http.proxy
git config --global --get https.proxy
直接使用客户端代理
当前最简单、最方便的方式**shadowsocks-windows**,这里是拿windows做演示,其他平台不是这个仓库。
- 客户端安装:https://github.com/shadowsocks/shadowsocks-windows.git
- 选择 releases直接下载到本地,免安装,直接使用。
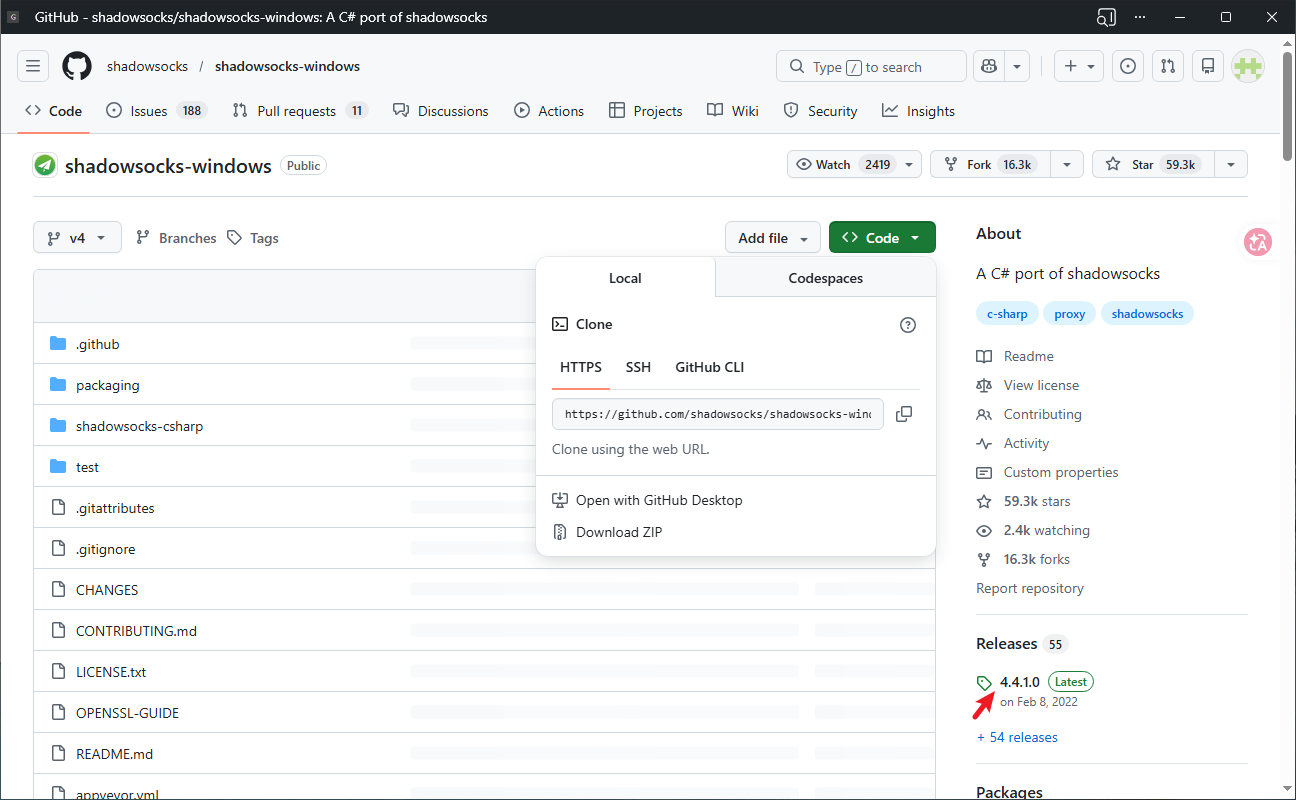
- 配置:按照下图填写你的服务端,注意加密方式一定要一致否则连接不上。
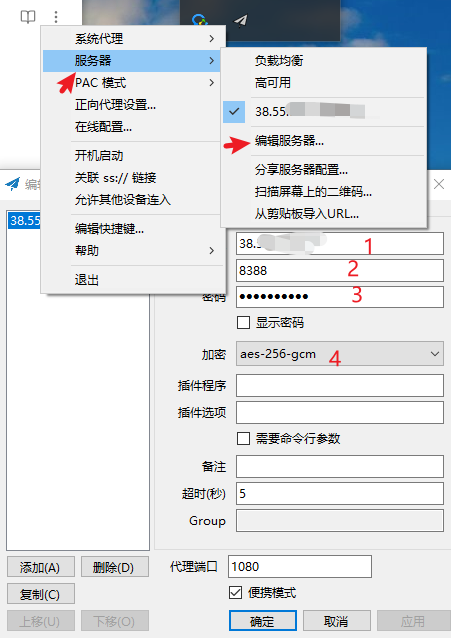 4.一般使用PAC模式,既智能代理,当需要代理时自动使用。
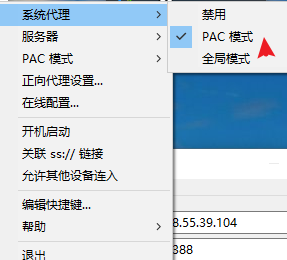
配置浏览器使用代理
Chrome/Edge
- 设置 → 系统 → 打开计算机的代理设置
- 配置 SOCKS5 代理:
- 代理服务器:
127.0.0.1 - 端口:
1080
- 代理服务器:
Firefox
- 设置 → 网络设置
- 选择"手动配置代理"
- 配置 SOCKS v5:
- SOCKS 主机:
127.0.0.1 - 端口:
1080 - 选择 “SOCKS v5”
- SOCKS 主机:
故障排查
服务端日志查看
# 查看实时日志
journalctl -u shadowsocks-libev -f --no-pager

# 查看最近日志
journalctl -u shadowsocks-libev -n 100 --no-pager

# 查看最近 5 分钟的日志
journalctl -u shadowsocks-libev --since "5 minutes ago" --no-pager
常见错误
1. authentication error
原因: 密码或加密方式不匹配
解决: 检查客户端和服务端的密码、加密方式是否完全一致
2. invalid address type
原因: 客户端实现问题
解决: 换用其他客户端(如 Python 客户端)
3. Connection refused
原因: 端口未开放或服务未启动
解决:
- 检查服务端服务是否运行:
systemctl status shadowsocks-libev - 检查云服务商安全组是否开放 8388 端口
4. Connection timed out
原因: 防火墙阻止
解决:
- 检查本地防火墙(UFW)
- 检查云服务商安全组规则
常用加密方式对比
| 加密方式 | 安全性 | 速度 | 兼容性 | 推荐度 |
|---|---|---|---|---|
| aes-256-gcm | 高 | 快 | 较好 | ⭐⭐⭐⭐⭐ |
| aes-256-cfb | 中 | 中 | 好 | ⭐⭐⭐ |
| rc4-md5 | 低 | 最快 | 最好 | ⭐⭐ |
推荐使用 aes-256-gcm,安全性和性能都很好。
服务端信息总结
服务器地址:<服务器IP>
端口:8388
密码:<密码>
加密方式:aes-256-gcm
使用注意事项
每次使用前先启动客户端
- Windows:
node start.js - Python:
sslocal -s <服务器IP> -p 8388 -k <密码> -m aes-256-gcm -l 1080
- Windows:
代理只对本机有效
- 如需局域网共享,需要修改客户端配置为监听
0.0.0.0
- 如需局域网共享,需要修改客户端配置为监听
加密方式不一致会导致连接失败
- 客户端和服务端的加密方式必须完全一致
云服务商安全组必须开放端口
- 即使本地防火墙开放,云服务商安全组不开放也无法连接
进阶:配置为系统服务
Windows
创建 shadowsocks-service.js:
const { createServer } = require('shadowsocks');

const config = {
  server: '<服务器IP>',
  server_port: 8388,
  local_port: 1080,
  password: '<密码>',
  method: 'aes-256-gcm',
  timeout: 300
};

createServer(config)
  .then(server => {
    console.log('Shadowsocks 服务已启动');
  })
  .catch(err => {
    console.error('启动失败:', err.message);
    process.exit(1);
  });
使用 PM2 管理服务:
# 安装 PM2
npm install -g pm2

# 启动服务
pm2 start shadowsocks-service.js --name shadowsocks

# 设置开机自启
pm2 startup
pm2 save

# 查看状态
pm2 status

# 查看日志
pm2 logs shadowsocks